
A recessed toilet paper holder, flush plate, tile-in waste bin, or concealed towel hook only looks effortless when the tile opening is exact. To cut porcelain tile openings well, the goal is not simply to get through a hard material. It is to create a controlled edge that follows the component precisely, preserves the tile face, and leaves room for a clean installation.
Porcelain is an excellent bathroom finish because it is dense, durable, low-absorption, and visually consistent. Those same properties make it unforgiving during fabrication. A rushed cut can chip the glazed surface, crack a narrow section, or leave an opening that is visibly out of square once a flush-mounted detail is installed. In a minimalist bathroom, there is no bulky trim to hide inaccurate work.
Start with the installed component, not the tile
Every opening should be sized from the actual installation system and its mounting instructions. Do not rely on a drawing alone, particularly when working with concealed bathroom accessories, cistern flush plates, or wall-integrated bins. The finished tile, adhesive bed, substrate tolerance, and required movement joint can all affect the final dimension.
First establish the finished face of the wall. Then mark the opening centerline and reference dimensions from fixed points, such as a finished floor, a wall corner, or the center of a sanitary frame. Measuring from an unverified rough opening often transfers an existing error directly into the tile.
Dry-fit the component before cutting whenever possible. Confirm whether the visible frame sits over the tile edge, within the opening, or fully behind it. Some systems allow a small concealed tolerance; others require a sharply defined reveal. The cleaner and more integrated the design, the more valuable a template becomes.
A purpose-made template is especially useful for Geberit or Grohe systems because it establishes the correct geometry around functional elements from the start. It also prevents a common problem: an opening that appears centered on the wall but is slightly misaligned with the mechanism behind it.
Choose the cutting method by opening shape
There is no single best tool for every porcelain opening. The right method depends on the opening’s shape, its position on the tile, the tile thickness, and the quality expected at the visible edge.
Rectangular and square openings
For straight-sided cutouts, a wet tile saw with a quality diamond blade delivers the most controlled result. It is the preferred approach for larger openings in wall tile, especially where edges will remain visible around a recessed accessory.
Mark the cut line on the face of the tile with a fine pencil or wax marker. Use masking tape over the line if it improves visibility or supports a delicate surface finish. Make shallow passes first rather than forcing the blade through the full thickness in one aggressive cut. This reduces chipping at the face and gives better control at corners.
Do not run a straight saw cut past the corner. Overcutting creates a visible line beyond the opening, and on a large-format tile it can become an immediate visual defect. Stop short, then complete the corner from the reverse side or with a controlled hand tool.
Circular openings for pipes and controls
Pipes, shower controls, and round service penetrations call for a diamond hole saw or core bit. Use a drill with suitable speed control and begin at a slight angle if the bit has no guide. Once the rim has started, bring the drill upright and keep the bit cool with water.
Pressure is not a substitute for cutting performance. A quality diamond bit should grind progressively through porcelain. Heavy force builds heat, risks glazing the diamonds, and can cause a fracture to travel beyond the hole. For an opening near a tile edge, cut slowly and support the tile fully beneath the work area.
Internal openings with rounded corners
An internal rectangle, such as an access opening or an integrated holder, needs special attention at its corners. Sharp inside corners concentrate stress, particularly in dense porcelain. Drilling a small radius at each corner before joining the cuts distributes that stress and significantly reduces the risk of a crack extending into the tile.
This detail may be hidden by a component frame, but it remains good practice. It protects the tile during cutting, transport, adhesive application, and long-term movement in the wall assembly.
Openings close to an edge
A cutout near a tile edge is one of the highest-risk situations. The narrow strip left behind may break even if the cut itself is clean. If the layout permits, shift the joint pattern or select a larger tile so the opening does not leave a fragile sliver.
When the location cannot change, use a continuous-rim diamond blade, slow feed speed, and solid tile support. It may be safer to create the opening before trimming the tile to its final outside dimension. That leaves more material around the work while the internal cut is made.
The blade matters as much as the saw
A powerful saw with an unsuitable blade will not produce a premium edge. Porcelain requires a diamond blade designed for hard, dense tile. Thin continuous-rim blades are generally the best choice for clean visible cuts, while segmented blades are more aggressive and more likely to chip a finished surface.
Blade condition matters too. If a blade begins cutting slowly, it may be glazed with material. Dressing it with an appropriate abrasive dressing block can expose fresh diamond grit. Replacing a worn blade is usually less expensive than losing a large-format tile or compromising a finished bathroom detail.
Keep water flow consistent on a wet saw. Water cools the blade, carries away abrasive slurry, and helps limit edge damage. On a dry-cut tool, use a blade approved for dry porcelain cutting and allow short cooling intervals. Never force a hot blade through a precision opening.
Mark, cut, and finish with controlled tolerances
Precision is not the same as making every opening as tight as possible. Tile needs sensible clearance around components to account for manufacturing variation, adhesive thickness, and small building movements. The required gap depends on the system, so follow the component specification rather than guessing.
For a tile-in recessed detail, a consistent narrow reveal looks intentional. An opening that pinches on one side and widens on the other looks improvised, even when the accessory itself is high quality. Check diagonals on rectangular cuts before removing the center section. Equal diagonals confirm that the opening is square.
After cutting, soften only the sharpest arris with a diamond hand pad. The purpose is not to round the edge visibly. It is to remove microchips and reduce the risk of a sharp porcelain edge catching during installation or cleaning. Use a fine grit and make a few light passes. Excessive polishing can create a bright edge that contrasts with a matte tile surface.
Before setting the tile, dry-fit it with the actual component. Check the reveal from normal viewing distance, not only from inches away. In a clean, elegant bathroom, the eye notices inconsistent lines immediately around flush details because these elements are deliberately designed without distracting trim.
Common mistakes that compromise the final look
The most frequent mistake is cutting from assumed dimensions without checking the real installation depth and face position. A second is using a general-purpose masonry blade because it is already on site. It may get through the tile, but it rarely gives the quiet, clean edge expected around a premium built-in accessory.
Another issue is cutting all the way through a corner with a wet saw. The opening may still accept the component, yet the overcuts remain visible or create weak points. Finally, installers sometimes forget that the tile pattern itself must be considered. Veining, directional texture, and grout joint alignment should continue deliberately around an opening. The technical cut and the visual composition are one decision.
A clean opening protects the whole bathroom concept
Integrated accessories create more open wall space, simpler cleaning, and a bathroom with no unnecessary visual noise. But the architecture of that result depends on millimeters. The tile opening is the line between the wall finish and the concealed function behind it, so it deserves the same care as the visible fixture.
Use the correct template, a porcelain-rated diamond tool, measured clearance, and a patient cutting sequence. When the tile closes tightly around a recessed detail without chips, crooked reveals, or improvised trim, the installation feels calm, precise, and built to last.
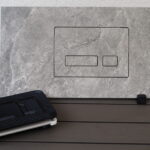
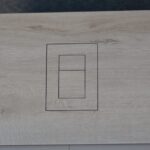


[…] recessed accessory should be planned as part of the tile grid. Its perimeter detail, cut edges, and waterproofing must be resolved before tile is installed. Where a component meets the tiled […]